Thursday 16 August 2018

Stash Busting Stained Glass Challenge.

I am really lucky to have some very supportive friends who say very kind things about my creations and are general cheerleaders in my life. One of whom is rather eager for me to remember to sew for myself. She is also not afraid to show off things I have sent her to anybody who will look. I had a hat commission as a result of this a few years ago. She also knows Clare of Fabled Stained Glass who makes beautiful bespoke stained glass windows. I have been in awe of her lovely designs for a while and was rather excited when she announced she had got some fabric printed with the designs. I then received a parcel containing a fat quarter and a note saying my friend had shown her my oystercatcher and puffin and said I would do something interesting while passing on my address. I am not sure I can live up to an “interesting” reputation but I was eager to see what I could do to showcase such lovely fabric. Despite not being religious I adore stained glass and am in awe of the skill and artistry that it takes to make them. My favourite local stained glass windows are in the library in Lerwick. I love the detail in the musicians and the oak leaf.
The fabric is a really good quality cotton and not too thin. Normally with a print that has characters or animals on there is the inevitable "cutting off of features" when sewing with it as I have spoken about before. You also get a lot of waste with fancy cutting. The beauty of the grid format is that it allows the rectangles containing the picture to be cut out without “accidental decapitation”. I decided to challenge myself to use all of the complete rectangles on the fat quarter to make a series of projects where the fabric can star as the focal point. Unlike a lot of fat quarter challenges I was content using as much other fabric as I wanted as long as I had it in my stash. I resisted the temptation to just create 40 different projects each using a single rectangle. In the end I settled on 7 projects using them to explore different aspects of the design and fabric combinations.


I contemplated making a tea wallet but worried when folded I would lose too much fabric on display – I thought about a flap on a messenger bag but that was almost too obvious then I remembered a pattern that was on my wish list of things to make (best not to discuss the length of that list!). It is a very basic origami/bento bag which uses 3 squares of fabric to make up the outside of the bag. The pattern was not actually lined but I chose to line it with a strip of blue fabric. The finished bag is surprisingly spacious – I decided not to tie the two corners to make the handle and added a button instead. It was really fun and easy to make and showcases and nice big square of fabric. 


My second project was a small zipped bag, I have lost track of how many little bags like this I have made – I made the first one in 2011 and they have been a staple of my gift giving ever since. They are versatile and can be made in different sizes and with collections all nestled inside one other; I once made a set of 6 with Russian doll fabric just for the irony. I never specify what they are for as they can be used for make up or as a pencil case or just for embroidery projects. I decided to use two rectangles each side to make that the dominant fabric with a little bit of blue added to make it a little brighter and highlighs the lovely blue strip in the design. The only challenging bits of this pattern is the zip which even now takes a bit of concentration and a deep breath. I chose not to add box corners as I would loose too much of the fabric. I think this one will probably be a pencil case but who knows.


I have been meaning to try some of these lovely little bowls for a while. I use a lot of small bowls when sewing sequins and beads or making things from the pipsqueaks book. I loved the idea of getting to the end of a task by uncovering the design below. A bit like "peek a boo" for grown ups…. I could have made this project a lot faster by sacrificing the herons around it but I was on a mission not to do that. I used a one heron rectangle for the small bowl – I cut two pieces of co-ordinating fabric (3.5cm bigger than the rectangle all the way round). I then attached the heron rectangle to the centre of the inner bowl fabric. I did this using a machine blanket stitch. I like the fact this make the base a little heavier and thus a little sturdier. I used two heron rectangles for the bigger bowl and this time machine stitched right at the edge and covered up the raw edge using a decorative hand embroidered chain stitch with 3 strands of black embroidery thread. I am not sure which I prefer. It will be interesting to see which holds better in the long run. I then stitched the top and bottom pieces right sides together turned through a small turning gap and ladder stitched the gap before sewing the corners together to make the bowl. The fabrics all co-ordinate with other projects. I love how effective these are.


I have a bad habit of breaking headphones, the left one tends to stop working a lot and they get bashed and jumbled in my bag. I went through a phase of keeping them looped on a wooden clothes peg but even that didn't help..... I therefore decided to make a little case using two rectangles of the fabric. It was lined with black cotton fabric cut a little longer than the rectangles and turned through the lining at the end. I added poppers and little buttons on the outside to co-ordinate with other projects. The photo shows the front and the back. I love how cute and practical it is and it is already proving to being easier to find them in my bag. Less tangled too...


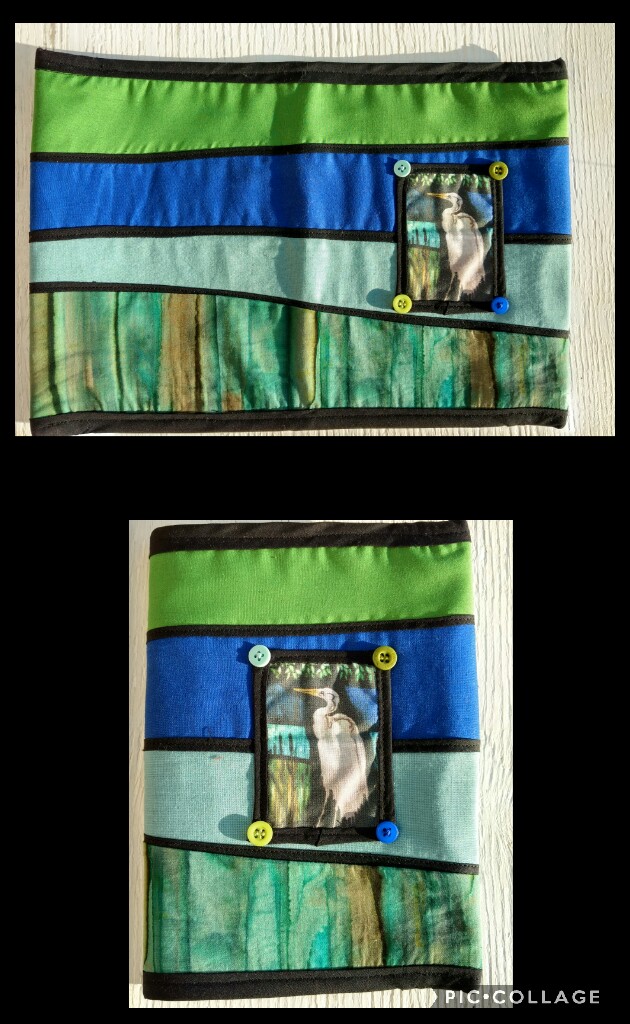
Another of my "go-to" makes is a notebook cover – there is something satisfying and tactile about having covered notebooks. I made myself a Christmas planning notebook cover years ago using a fabric wrap from lush that was bought for me (by the same person that recommended me for this fabric so it felt right to go full circle). There was of course a temptation to make the whole notebook cover in the fabric – it would showcase it nicely. This would have meant that I did not have enough for the bag though, and it also would have felt a little ”safe”. It is fair to say I could have gone through 3m of this fabric with none left but the joy of having a relatively small amount to work with is it make you think really carefully about how you use it and what you really want – it also forces you to be a little creative. I thought about putting a rectangle on the blue I used for the bag – it’s nice to co-ordinate. What I really wanted to do was explore some of the elements of the design. The bird is striking but actually the detail and intricacies are interesting in their own right. So with the notebook I chose to explore the colours used. I sorted through my scraps and found 4 strips just long enough that matched the 4 areas in the fabric including the most perfect batik green. I don’t tend to think about fate but I decided it was a sign that the universe was on my side – my husband felt it was a reflection of the size of my fabric collection that I can match anything..... I lined the four strips up and it felt too uniform so then experimented with using some on a slope to reflect the actual design. This was better but not right – it needed the black "lead" to break it up and mirror the design. I thought about piecing in thin strips of black but it would be tricky and hard to keep a steady width on such thin fabric – I also contemplated machine stitching the black lines but that would be a challenge to get just the right thickness of thread and would make it more likely to pucker (I really like the word pucker!). I then decided to use some bias binding. Thankfully I had just enough black in my stash so I added the bias binding along the strips. I then had to add on my rectangle – I didn’t want to use one of the bowl methods so I chose to use bias binding so that it was in keeping with the rest of the notebook. Mitered corners on something (6cm x 8.5cm) was tricky but thankfully I had buttons to cover the offending corners and coordinate with the bag!  As I said I had just enough fabric lengths for the cover. If I had been making it for a gift I would have wanted to be longer so instead of sewing the front and back right sides together and turning I opted to sew the front directly onto the back and edge with (you guessed) more bias binding. I ladder stitched the end sections to make the flaps to wrap around an A5 notebook. I was really pleased with the outcome - it isn't technically perfect and it did evolve a bit but I feel it highlights the use of colour in the way I wanted to.


The bookmark was a really basic project that took minutes to
put together and a lot longer to embroider! I had come across it numerous times as a way to use fabric scraps – again having a fabric with straight edges lends itself to this and looks really effective. I had thought about adding elastic to the back but the tassel won in the end as it allowed me to play with pretty coloured embroidery thread! I wanted this piece to highlight the texture and amazing detail in the design. I used a single strand of black embroidery thread and tiny backstitch to outline the leaves. I used two strands to embroider the rushes using French knots and backstitch. It was fun to lift out the details. Although it did lead to me photographing leaves in the town flower garden.  


I have explored the colour and textures – I have even used thick black borders as a nod to the lead. I used a large section to just speak for itself and highlighted the fabric in my pencil case but the one thing I have not done is pay rightful attention to the heron who is after all the subject of this beautiful window! I gathered up the remaining scraps from the book and the bowls to discover I had just enough for coasters. To make the coasters I used one rectangle and added on co-ordinating fabric at the sides. I then layered some wadding and a co-ordinating backing fabric that was 1.5cm bigger all the way round than my top design. Using black thread and my friend's sewing machine (I actually have the best friends!) I quilted around the Heron. This gave a subtle lift to the heron on the front and made a fantastic heron on the back. I made 4 of these and it is best not to compare them as my quilting is not that consistent.


I had a lot of fun with this fabric. It was lovely to get to work with such a special design and explore the features of it. It is a strange feeling having been in contact with the designer as it made me want to try and do it justice and show it off to its best. I also gave me the perfect excuse to make lots of things for me and not wait too long to do it. As I said at the start this was kindly posted to me - I would like to make clear that there was no requirement to blog or review the fabric and this is just because I was excited by it.


Sunday 6 August 2017

Lottie Week Day 7 - Stylish storage and Future Plans

Today’s blog is all about the bags I made to go with the Lottie clothes and accessories as well as a quick round up.

I have made various bags in the past to be used as everything from make-up bags to pencil cases. I tend to store planned projects in individual bags so it's something I am drawn to. I had found amazing 'Girl Friends' and 'Wonder Fabric' ranges by Ann Kelle for Robert Kaufman and I used her 'Urban Zoologie' fabric for my little girls quilt. I decided to make 3 bags of different sizes with the intention of the large one being for Little Miss Es Lottie dolls (she has more than one, with different names, but for the sake of this blog I've called them all "Lottie"). The middle sized one is for the clothes and the smallest for being for accessories.

The fabric for the dolls is perfect for Lottie as it is a series of girls doing all sorts of jobs. This fitted with the range of dolls and sets available. I think it is obviously important to tell our girls that they can do anything and be anything they want, but I also think it is important to have that message all around them and in the things that they play with. As I have previously mentioned Little Miss E loves a bit of sparkle and dressing up so I used the princess print out of the same range for the second bag. This is a fun print showing girls with different hair and skin colours in lovely dresses. There is nothing sexualised about the dresses and the girls are the shape of girls, not women, so I felt this also tied in with the Lottie doll company. The final bag is made with the unicorn print, I love the bold primary colours (and who doesn’t love unicorns!). On a side note I am a little bit in love with the Girl Friends range mermaid print and I have just discovered that you can make soft toys of the girls dolls – this is going to have to be added onto my to do list.


Ann Kelle Fabric bags for Lottie
All three bags were made in the same way. Firstly, two pieces the same size were cut out for the lining fabric, then one piece was cut out of the pattern fabric using the lining as the template. A second piece was then cut out of the pattern fabric which was the same width as the lining fabric, but only 75% of the height. A fifth piece of fabric was cut out of a coordinating solid colour that again is the same width, but this time only 30% of the height. The solid colour fabric was embroidered with letters to show the intended "purpose"; remembering of course that we are talking about a 4 year old playing with her toys!

I thought for a while about the font I should use for the embroidery and was almost ready to Google “Child style handwriting” when it occurred to me that it would be much more personal to get my daughter to do the writing. She wrote 'Dolls', 'Clothes' and 'Play' for me on a piece of A4 paper and I used the transfer pen I had used in Day 2 (for the fairy wings) to trace it before ironing it onto the fabric; I used a basic back stitch to embroider the words onto the fabric. The solid colour fabric was stitched along the long edge to the top of the smaller piece of pattern fabric, pressed and trimmed to be the same size as the other piece of patterned fabric.

Girl Friends Big bag
Girl Friends Medium Bag
Unicorn Wonder Fabric

I sandwiched the zip between the top fabric and the lining fabric on both sides and stitched it in using a zipper foot. I then stitched the sides and bottom of the bag on the patterned fabric with right sides together. I flattened the bottom corners to make a triangle and stitched a line across 5cm down from the point on each side. I trimmed the triangle off which created a nice gusset, then I repeated the step with the lining, leaving only a small turning gap in the bottom. I turned the bag out through the gap and stitched it up using a ladder stitch.


Layout one
|Layout two
I have a couple of photos here of all of the things I made laid out just to give sense of scale of the different pieces. I didn’t want to include it at the start as I wanted outfits revealed each the day... It has been such a fun project to carry out and I feel I have learned a lot. I knew the small size would be the obvious challenge and it was. I now have a better understanding of what techniques can be transferred from making children’s clothes to dolls clothes. I love felt and tiny buttons even more. I have become more experimental in my approach to design and gained some confidence. I would like to try my hand at more pattern drafting in the future. I don’t think this ends my adventures with Lottie –
I have a feeling she will have a gift under the Christmas tree this year that matches
Little Miss E’s present...

Saturday 5 August 2017

Lottie Week - Day 6 - Lottie takes a role in the South Mainland Up Helly Aa (SMUHA)

This is the sixth set of clothes and accessories for Little Miss Es Lottie doll and my personal favourite. This was the most obvious outfit to me and it was in my head as soon as I started planning what to make. Shetland is known for its Viking connections and through the Winter every year the Up Helly Aa fire festivals take place. The most publicised is the Lerwick Up Helly Aa (which is also the largest) however there are many smaller regional festivals. Our local Up Helly Aa is the South Mainland Up Helly Aa (SMUHA).

SMUHA is a more recent addition to the fire festival calendar and is more inclusive allowing women to be part of the squads and to take the role of Guizer Jarl (or head Viking). The festival consists of squads of people in fancy dress with the main squad (the Jarl's Squad) dressed as Vikings. They lead a torch lit procession through the streets ahead of a galley which is then set on fire at the end of the procession. The smell and the atmosphere is like nothing else and the work that goes into the suits is amazing! There are all night parties at local halls after the burning and the Jarl squad will attend charity events in the following year. Little Miss E's Dad and Brother were in the squad a few months before she was born in 2013 so I loved the idea of Lottie getting to dress up as a SMUHA Shield Maiden, and the progressive nature of SMUHA seemed in keeping with the ethos of the Lottie company.

SMUHA Lottie in front of Hoswick Beach 


The 2013 SMUHA was the first we attended with our little girl and so the night holds fond memories for our family too.
The Galley - Sunnahamar

Lighting the torches


SMUHA Lottie Outfit
Thankfully SMUHA 2013 has an extensive website which documented the suit making. This allowed me to look in depth at the shield maiden suit as well as the extra detail in the jewellery and I was able to see the real thing on display at the Hoswick visitor centre. This outfit isn't a perfect replica but I would say it is "inspired" by the 2013 squad... and thankfully the squad members who have seen it recognise it!


I had the perfect piece of dark green fabric in my stash and I immediately knew that it would make the base dress. I started with the mini dress pattern I used for Day One. I then needed to figure out how to insert the sleeves. I have not inserted sleeves in anything this way before and I was mindful that I was trying to do it on something so small! I spent quite a bit of time looking at shirt making and to draft the sleeves I measured the armholes in the dress, then I made the curve of the sleeve the correct size to fit into the armhole. I then added on a generous seam allowance and tapered the ends to give a wide cuff so there were no issues getting the hands of the doll in. I used an old pillow case to make up mock dresses to see what would work and make sure the sleeves would go in OK. It took a few attempts before the sleeves were wide enough and the shoulder seams were sitting right. My first attempt with the actual fabric was a disaster - it frayed and fell apart – and I tried and emergency zig zag stitch but it was too late. The second time I traced the pattern onto the fabric and zig-zagged along the lines. I then cut around leaving a small seam allowance. I stitched the two back sections to the front piece right sides together along the shoulder seam and then inserted the sleeves. I stitched the sleeve seam and the sides of the dress on each side and before hemming it I added the rest of the details.

I used a dark green felt to make the shorter dress that goes over the top. As with many of the pieces in this project the construction was based on trial and error. I sketched out the shape of the front piece and added a seam allowance at the sides. I then measured the back pieces so they were as wide as the back pieces of the dark green base dress. I stitched the sides of the dress to the front pieces and then trimmed the seam to make it as snug as possible and, finally, stitched the top of the felt dress to the base dress.

2013 inspired dress design


Celtic knot style buckle
 
For the belt I cut a long strip of black felt,  again judging the width by eye. I stitched this from one of the back pieces at waist height along to the second back piece. I then had a lot of fun playing with metallic embroidery thread to make the buckle. In the end a circle was satin stitched using green metallic embroidery thread and I used three lazy daisy stitches in silver embroidery thread to make the Celtic knot style motif. The circle was cut out and the edges were stitched with more green thread. The buckle was then attached to the belt.


I could not find the right ribbon to the trim the dress so I used a strip of silver that I had in my stash and embroidered over the top. The stitch I used in the end was, I believe, my own creation. I got 9 strands of embroidery thread and plaited each set of three. I then plaited the three sets together and (this is where it becomes unusual) separated the top loop of the plait and secured it with a small loop, creating a hole. I moved along one section of the plait and separated the bottom strand and secured it in the same way. I moved along the plait created holes alternately in the top and bottom this way. Although not an exact match to the ribbon used in the original it gave a good effect.


Embroidered Ribbon


With the dress comes a cape/skin so I used a sample piece of fake reindeer fur for this (and it was just big enough!). I measured the length it needed to be and calculated the width by lying Lottie down and adding on the shoulder sections. I sketched this all out and cut it out of a piece of cream felt. I used this to make sure that it was the right proportions. I added a press stud to each shoulder piece and then used the felt as a template to cut the fake fur. I was nervous enough not to spoil a 99p sample, so goodness knows how nervous they were with full skins! The fur and the cream felt were stitched together using a blanket stitch and I then added the other half of the press stud to the corresponding part of the dress. In the original there is a chain that goes between the two sides of the fur. To recreate this I added three small links from a bracelet making set.


Chain detail.
After all of these details were added I tided up the seams, creating small rolled hems and hemming the felt and dark green dress together to reduce bulk. After this I added the strip of Velcro down the back of the dress so that it was easy to get on and off.

The joy of looking at all of the details on the website is that I got to see the making of the jewellery – they had amazing necklaces and knotted bracelets. I took liberties with this for Lottie's accessories and to make the necklace I used an idea I had seen for making friendship bracelets where you fasten them with (yet another...) tiny button. The main part of the necklace was contructed using finger crochet to incorporate a charm. I had some sparkly green beads that made a lovely bracelet on some elasticated thread.

Lottie SMUHA inspired jewellery
The final part of the outfit was the shield. It is probably no surprise that I chose to use felt as it has featured heavily throughout. I embroidered the design using metallic silver thread and a chain stitch. The dot in the centre is a single French knot. I then cut a circle out around it and added a second circle of felt to cover the back of the embroidery. I stitched them together using silver metallic thread and a blanket stitch. There was a small piece of elastic added on the back so it would stay on Lottie's arm.


2013 SMUHA inspired shield

This outfit was a really interesting one to make as it was all about trying to recreate something that already existed. The previous outfits had been about making something I had imagined, and even when I used a template I often added my own twist or whimsical fabric. It was lovely to go back and look at the little details and be inspired by someone elses designs. I know it is not a "to scale" replica but I have to remind myself again that the idea was to make a toy not an exhibition piece. It did feel different to make this outfit with the pressure of staying true to something you admire.


SMUHA Lottie looking out to sea.


Friday 4 August 2017

Lottie week Day 5 - Dressing up

Little Miss E is the queen of dressing up and she loves a little bit of sparkle. I really wanted a multi-purpose dress up set.


Mermaid Lottie on Hoswick beach.

I started this set with a swimsuit tutorial. The fabric used is actually a sample piece and was just enough. The tutorial is easy to follow and really helpful. I changed the neck slightly and added a halter-neck with a popper hidden at the front making it easy for little fingers to put on and take off.


Swimsuit

The first dress up outfit was a mermaid. The was a really simple design; I drew a wide line around Lottie lying down from one side of her waist round her feet to the other side of her waist to make the tail shape and sketched in the tail fins. I cut out two pieces of purple felt for the tail and four pieces of pink felt for the fins. I stitched the pink fins right sides together leaving the top open and turned them through this gap. I sandwiched the fins between either side of the bottom of the tail and stitched around the tail leaving the top open. I then cut 3 cm down the center of the back of the tail and folded one piece over the other and added a press stud, and I added two small darts to improve the fit.

This was all quite straightforward and took less trial and error than the rest of my self drafted patterns. That was until the sequins and beading... I decided that the felt on its own was not 'exciting' enough so I bought flat purple sequins (1cm across) that I could overlap to look like scales. This way each sequin covers the stitch of the sequin below. It also allows the sequins to shimmer in the light. For the fins I stitchd on individual 5mm pink sequins each with a tiny pink bead in the center. This took a lot longer than I had anticipated but gave a really fun effect. I finished the top line of purple sequins with pink beaded ones to cover up the purple holes.

When I am making something for a person I like to have something going on that makes me thinks of the person I am stitching for. This is normally music, a programme or even a drink. I was not able to take up the whole process with something that made me think of a (at the time, almost) 4 year old but I did sequin the tail while watching Bubble Guppies with my daughter. 


Mermaid tail


To go with the mermaid I decided to include a mini Tilda spermwhale. Lots of children’s toys include dolphins but a sperm whale seemed more unusual. I also like that Day Three had narwhal fabric so I was happy to be a little bit different again. I have made a lot of Tilda sperm whales of al sizes so it was a personal thing for me to make and give and I chose pretty flower fabric to match with the pink and purple mermaid. The whale is mostly made on the sewing machine with just the fins hand stitched on. Despite the simplicity of the pattern you get such a lovely expression just from the length of the mouth and the position of the eye. For the eyes I used a tiny black button, a French knot would have also been fine.


Pattern matching on the sperm whale
 
Every girl needs a flowey sperm whale
 

The second outfit was a fairy. This also uses the swimsuit as a base. I made a really simple skirt by gathering glittery net fabric using a large running stitch. It was so glittery that I am still finding glitter, and I may need to apologise to the Little Miss E’s family for this too. I measured Lotties waist and multiplied it by 1.5, then gathered it up by hand and added a strip of the lycra from the swimsuit which was slightly longer than the net fabric. I stitched the two short net ends together from the bottom to 1cm below the waist band. I added mini poppers and tiny buttons to finish and tidied up the open bit of net. This was not the tidiest finish and I might be tempted to take a different approach if I made one again.


Fairy dressing up set

I wanted a lovely fairy wing shape, I was thinking more insect inspired than "Tooth fairy" so I found a lovely shape and shrank it on a photocopier, I traced the details with a transfer pen and ironed the pattern onto felt. Metallic thread is difficult to use as it has a tendency to snag so I combined it with a single strand of grey thread. I used back stitch to put in the lines and then cut the overall shape. I embroidered the felt first as I was able to keep the tension by putting it in an embroidery hoop. If I had embroidered it after I had cut it out then it would have stretched and lost its shape. Having cut out the felt wings I then used it as a template to cut out a piece of metallic fabric. I stitched the two together using a small blanket stitch, and I added a press stud on the metallic side of the wings in the middle and then I sewed the other side of the press stud onto the back of the swimsuit. I pondered this solution a lot; Initially I wanted bits of elastic as you would use for a childs play wings, but it was going to be too fiddly, too easy to tangle and look clumsy. The downside of my use of the popper is that it can only be used with the swim suit. This was another time I had to remember that it is to be played with and that it is okay to use the wings just with the swimsuit.

Fairy wings


I love how fun and bright this set is and its one I can see encouraging imaginative play. As Little Miss E has more than one Lottie doll I still wonder if I should have made a second swimsuit so that there could be a mermaid and a fairy at the same time. Maybe Lottie... I mean Little Miss E... will get a surprise at some point.

Also... She might need a wand.....

Flower pot Fairy
Wing close up


Thursday 3 August 2017

Lottie Week - Day 4 - Bed Time

When researching things I could make for Lottie I came across quite a few doll sleeping bag patterns which got me thinking that having a "Bedtime Lottie" would be a good idea. This, as with the other sets, led to lots of ideas all linked to the theme.

Bedtime set


I started with pyjamas - the first pattern I ever self drafted was for big sister pyjamas for 3 girls when their brother was born. I used the same principle to draft some pyjama bottoms and again tested my pattern using a pillow case. After two attempts I had modified the gusset and had a working pattern. I made them using beautiful green fabric covered in small Scottie dogs. I trimmed the bottom with tiny pom poms.
Scottie dog pyjama bottoms

I made a top using the same principle as the cardigan on Day Two. I decided the fabric would be too thick to insert the arms separately. I created the front template by adding arms to the top part of the simple dress pattern. For the back I traced the front pattern piece - straightened where the neck was curved and cut it in half . I then added 3cm to each half to make sure there was enough fabric to add the Velcro to to close it. The front and back pieces were machine sewn and then the Velcro and hems were done by hand. I embroidered a small Scottie dog onto the front of the pyjama top so it co-ordinated with the bottoms.


Scottie dog pyjama top


Tiny slippers
I found a slipper photo and modified instructions to fit Lottie. This included drawing round Lottie's feet and some trial and error getting the shaping right on the strip of fabric. I blanket stitched the strip to the sole using thread the same colour as the pyjama top and added a pom pom on each to co-ordinate with pyjama bottoms.


Pipsqueaks teddy
I made a pipsqueaks bear to go with the set. This is one of the more basic pipsqueaks design and I adore the simplicity and the beautiful bow. The stitching on the face makes it look so happy and gives each bear an individual expression. It is also where Sally (of Pipsqueaks fame) started with her journey into the world of felt so it seemed overdue for me to have a go at it. I really think I should make a pair of them into earrings for myself.


I decided to make Lottie a quilt. I measured the size that I wanted based on Lottie lying down and sat with a piece of graph paper and a lot of head scratching. I started the quilt with a lovely piece of stripy dachshund fabric. Little Miss E owns a Dachshund and so it was perfect. I love sorting through my stash for the right patchwork pieces especially as it is a lovely excuse to look at fabric that reminds me of all of the things I have made in the past. The three main colours in the dachshund are dark pink, lime and blue. I had a scrap of Little Red Riding hood fabric designed by Tasha Noel for Riley Blake. I managed to get 3 perfect sized pieces to tell the story on the left hand side of the quilt.e. The middle patch is made of lovely funny bunnies.

Bunny side of the pillow

Scottie dog side of the pillow

The turquoise panda fabric is one I have used many times and love. I also included the lime fabric with the Scottie dogs so it would match the pyjama bottoms. The
other pieces tied in with the colours and had a small enough print as by this point I had designed the simple layout. I used a soft brushed cotton for the back. To quilt it I used the basic "stitch in the ditch" method. The quilt was bound from the back and hand stitched on the front. I made a matching pillow using the bunny fabric and pom pom trims to tie the project elements together. This was just two basic rectangles, one bunny rabbit fabric and the other Scottie dog fabric stuffed with toy filling.


Lottie Quilt


For the sleeping bag I used Lottie as a guide to the overall length of the bag including the area the head goes on. I then measured length without the head area. I added these two measurements together and cut two long pieces of fabric. The outer fabric is a lovely needle cord decorated in tiny flowers; it was used last Christmas to make my daughter a blue, purple and pink Melly and Me dolphin as they were her favourite colours at the time. I opened out the zip fully and sandwiched it between the two pieces of fabric starting at the none curved edge of the fabric. I then stitched the two pieces of fabric right side together all the way round leaving a small turning gap. I turned the whole thing through the turning gap and closed the gap. I zipped it up and then using a small ladder stitch I closed up the side opposite to the zip. I also made a matching pillow as I didn’t want the doll with the sleeping bag to feel left out next to the one with the quilt…. Again this was an indicator I needed to move away from Lottie!


Fabric bought for Melly and Me dolphin


Flower sleeping bag

When it all came together I could imagine play sleepovers and camping. Since making this Lottie dolls have released a tent and camping set - I think this should be added to Little Miss E's wish list!
Ready for bed with pipsqueaks Ted
Lottie ready to camp
Lottie under her quilt


Wednesday 2 August 2017

Lottie Week - Day 3 - Dog Walking

The third outfit set compliments that of Day Two and this one was made at the insistance of my little girl thinking that Lottie also needed a blue outfit.

Blue set

The top for this outfit uses the same template as for Day Two and again by using cotton I had to make the pattern a little bigger. This time I decided to add poppers on the front and embelish with mini buttons so that it is more like a shirt. I opted for a white top with the co-ordinating fabric sleeves.

"Shirt style" top


Sleeve detail
I used a reversible skirt template for a much bigger doll and I scaled it down by measuring the length and 1.5 times Lottie's waist, then added on the seam allowance all around. The two fabrics were stitched right sides together before being turned through a turning gap. I closed the turning gap using a small ladder stitch and added a strip of Velcro at the corresponding top edges to allow it to close both ways. The fabrics used for this were a beutiful Narwal fabric from Tales of the Sea by Lewis and Irene that I got for my birthday and a Riley Tartan, which is actually an Irish Tartan that my Mum used to make my husband a waistcoat for a Scottish wedding. Again it felt right to include fabric that was important to us to make the gift more special.

Narwhal side of reversible skirt

Riley tartan side of reversible skirt

I love a good poncho and my husband knitted me a lovely one when I was pregnant. Poncho appreciation is something Little Miss E's Mum and I share, so I thought it would be fun to include one. Again I turned to recycling as with the cardigan in Day Two. I had a lovely wool jumper that was springing holes all over the place and past darning. I boil washed it and it felted up really well. I used the rib and cut two rectangles. I stitched them together adding a small popper at the back. I added a basic blanket stitch to neaten the edges, although I was confident it was felted enough not to fray.

Upcycled Poncho


To go with this outfit I made a tiny dog made using the Pipsqueaks book. The dog has a lovely shape and was a joy to sew with the head and tummy pieces allowing it to stand properly.  To increase the play aspect of this I also made a dog lead. I added a bracelet loop to the collar and made a lead using embroidery thread plaited to incude a bracelet lobster clasp at the end. The functionality of something so simple made me more excited than I should admit.

Pipsqueaks dog

Lead

This outfit works well with the blue side of the reversible bag described on Day Two.

Blue and purple bag


I love the simplicity of this combination and the reversible skirt works really well.

Dog walking

Tartan Skirt

Friends